Are you planning to design a gym space that stands out and functions perfectly? Using Gym Equipment Revit models can make your project faster, smarter, and more accurate.
Imagine having ready-to-use, detailed equipment layouts right at your fingertips, saving you hours of work and preventing costly mistakes. You’ll discover how Gym Equipment Revit tools can transform your design process, helping you create spaces that impress both clients and users.
Keep reading to unlock practical tips and insider secrets that will make your next gym project a success.
Credit: www.cgtrader.com
Choosing Gym Equipment In Revit
Choosing gym equipment in Revit requires more than just picking models off the shelf. Your goal is to create a realistic and functional gym layout that meets the needs of users and fits the design intent. Understanding how to select and adjust equipment can save you time and improve the accuracy of your project.
Popular Equipment Families
Revit offers a variety of gym equipment families that cover common workout needs. You’ll find treadmills, stationary bikes, weight benches, and multi-gyms among the standard libraries. These models come with predefined dimensions and materials, making it easier to place them quickly in your design.
Consider how each piece fits your gym’s purpose. Are you designing a cardio-focused space or a strength-training area? Picking the right equipment families upfront helps you avoid clutter and keeps your layout practical.
Customizing Equipment Models
Sometimes the default equipment doesn’t match your project’s style or size requirements. Revit allows you to customize these models by editing parameters like height, width, and color. You can also adjust materials to reflect specific brands or finishes.
Personalizing equipment models can make a big difference in client presentations or detailed construction documents. Have you ever noticed how a small color change can make equipment blend better with the overall design?
Importing Third-party Content
Not all equipment you need will be available in Revit’s native libraries. In those cases, importing third-party content is a smart move. Many manufacturers provide Revit-ready files that you can download and add to your project.
Make sure the imported models are optimized for performance to avoid slowing down your project. Are you prepared to check the file size and level of detail before placing complex equipment?
Designing Gym Layouts
Gym equipment Revit helps create clear and accurate gym layouts quickly. It allows easy placement and adjustment of machines for better space use. This tool supports efficient design and planning of gym interiors.
Designing Gym Layouts is both an art and a science. It requires thoughtful consideration of various factors to create a space that is not only functional but also inviting. A well-designed gym layout enhances user experience and optimizes the use of space, making workouts more efficient and enjoyable.Space Planning Tips
Start with a clear understanding of the gym’s dimensions. Use this information to decide where each piece of equipment will go. Consider the size and use of each piece; a treadmill needs more space than a set of dumbbells. Create designated areas for different types of workouts. Cardio, strength training, and flexibility exercises often require different spaces. Allocating specific zones helps users find what they need without wandering. Think about storage for smaller items like mats and bands. This keeps the gym tidy and equipment accessible. A clutter-free space encourages users to work out more efficiently.Traffic Flow Considerations
Ensure that pathways between equipment are wide enough for easy movement. This prevents bottlenecks and reduces the risk of accidents. Users should feel comfortable navigating between machines without feeling cramped. Position high-demand equipment in easily accessible areas. This reduces congestion in more remote corners of the gym. Popular machines like treadmills and ellipticals should be in central locations. Consider how people naturally move through the gym. Observe patterns and adjust layouts to accommodate these movements. A logical flow enhances the overall user experience.Zoning For Different Activities
Create zones for varying activities to cater to different workout needs. For example, designate an area for yoga and stretching with mats and mirrors. This allows users to focus on their practice without distraction. Separate noisy equipment from quieter areas. Weightlifting can be loud, so placing it away from relaxation zones can improve the atmosphere. This also helps maintain a peaceful environment for those who prefer a quieter workout. Think about the lighting and ambiance in each zone. Bright lights work well for high-energy areas, while softer lighting suits relaxation spaces. Tailoring these elements to the activity can enhance the overall experience. By considering these aspects, you ensure a gym layout that is both practical and user-friendly. How will you transform your gym space to meet these standards?Optimizing Equipment Placement
Optimizing equipment placement in a gym design using Revit is more than just fitting machines into a space. It’s about creating a flow that enhances the workout experience while ensuring the environment feels inviting and functional. Thoughtful placement can transform a gym from a cluttered room into a user-friendly fitness hub.
Maximizing User Comfort
Comfort starts with spacing. Ensure there’s enough room around each piece of equipment for users to move freely and perform exercises without feeling cramped.
Consider the natural movement patterns of different workouts. For example, place cardio machines near windows or screens to keep users entertained and motivated.
Adjust the height and orientation of equipment in your Revit model to replicate real-life use, helping you visualize comfort before installation.
Safety And Accessibility
Safety should never be an afterthought. Use Revit’s tools to check clearances and pathways, making sure emergency exits and walkways remain unobstructed.
Think about users of all abilities. Position equipment so it’s easy to access for people with mobility challenges, and include adaptive machines if possible.
Test your layout by simulating traffic flow in Revit to identify potential bottlenecks or hazards that might not be obvious at first glance.
Integrating With Architectural Elements
Gym equipment doesn’t exist in a vacuum—it interacts with walls, windows, and lighting. Use Revit to align machines with architectural features like natural light sources to enhance the workout atmosphere.
Pay attention to structural supports and ceiling heights. Avoid placing tall equipment under low beams or near HVAC vents that could interfere with use.
Consider how electrical outlets and data ports fit into your design, ensuring all equipment can be powered and connected without messy cables.
Enhancing Efficiency With Revit Tools
Revit tools help designers and architects work faster and smarter. They improve accuracy and reduce errors in gym equipment projects. Using Revit, teams can manage complex designs with less effort. This leads to better planning and faster project delivery.
Using Parametric Families
Parametric families in Revit allow easy customization of gym equipment models. Users can change size, shape, and features without redrawing. This saves time and keeps designs consistent. It also helps maintain standards across projects. Designers can reuse families for different equipment types efficiently.
Creating Equipment Schedules
Revit can create detailed equipment schedules automatically. These schedules list all gym items with specifications and quantities. They help track materials and costs accurately. Teams can update schedules quickly as designs change. This reduces manual errors and improves project management.
Automating Repetitive Tasks
Revit automates repetitive tasks like placing multiple equipment units. Users can duplicate and align items with few clicks. Automation reduces manual work and speeds up modeling. It frees designers to focus on more important decisions. This leads to higher productivity and fewer mistakes.
Collaboration And Coordination
Collaboration and coordination are key in Gym Equipment Revit projects. Multiple teams work together to design, plan, and install equipment efficiently. Clear communication and shared data help avoid mistakes and delays. Using Revit’s tools, teams can align their work smoothly and ensure all systems fit perfectly.
Working With Mep Systems
Mechanical, Electrical, and Plumbing (MEP) systems must integrate well with gym equipment designs. Revit allows teams to model these systems alongside equipment layouts. Designers can check space requirements and connections early. This prevents conflicts and reduces rework during installation.
Teams can:
- Visualize equipment placement with ductwork and wiring
- Adjust designs to meet technical needs
- Coordinate schedules for installation steps
Clash Detection Strategies
Revit offers tools to spot clashes between components. Detecting clashes early saves time and cost. Teams can review 3D models and identify overlapping parts. This helps fix issues before construction begins.
Effective strategies include:
- Regular clash detection runs during design phases
- Assigning clear responsibilities for resolving clashes
- Using filters to focus on critical conflicts
Sharing Models Across Teams
Sharing Revit models keeps all teams updated. Cloud-based platforms enable real-time collaboration. Everyone accesses the latest versions, reducing errors from outdated files.
Best practices for sharing models:
- Set clear permissions for editing and viewing
- Use model linking to manage large projects
- Communicate changes through shared notes and comments
Rendering And Presentation
Rendering and presentation play a crucial role in bringing your gym equipment designs to life within Revit. This stage helps you see beyond blueprints, giving you a clear picture of how the final space will look and feel. It’s not just about aesthetics; effective rendering can highlight potential design issues early and improve communication with clients or contractors.
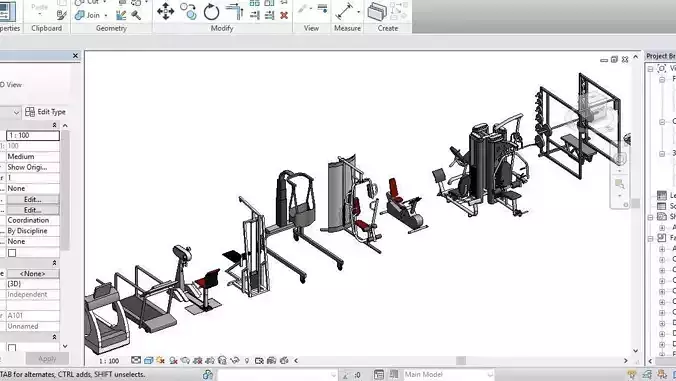
Visualizing Gym Designs
Visualizing gym designs in Revit allows you to transform simple models into detailed, lifelike images. By adjusting camera angles and lighting, you can showcase different perspectives that reveal the flow and space utilization of your gym layout.
Imagine presenting a design to a client who struggles to understand technical drawings. A well-rendered image can bridge that gap, making your ideas clear and convincing. How might better visualization change the feedback you receive on your designs?
Using Realistic Materials
Adding realistic materials enhances the authenticity of your gym equipment models. From the texture of rubber flooring to the shine on metal machines, these details create a more immersive experience.
You can select from Revit’s built-in material libraries or import custom textures to match specific brands or finishes. Have you noticed how accurate materials can influence a client’s confidence in your design?
Creating Walkthroughs And Animations
Walkthroughs and animations offer dynamic ways to experience your gym design. Instead of static images, clients can virtually move through the space, gaining a deeper understanding of layout and scale.
These tools also help identify potential bottlenecks or awkward equipment placements before construction begins. What new insights could you discover by seeing your design in motion?
Maintenance And Updates
Keeping your Gym Equipment Revit models up to date is crucial for accurate planning and smooth project execution. Regular maintenance ensures that your digital assets reflect real-world changes, saving you time and avoiding costly errors. Let’s look at practical ways to handle updates and maintain your models effectively.
Managing Model Revisions
Revisions are a natural part of any project. You must track changes carefully to avoid confusion and rework.
- Use version control:Save different versions of your model with clear labels and dates.
- Document changes:Keep a simple log noting what was modified and why.
- Communicate updates:Share revisions with your team promptly to ensure everyone works on the latest model.
Have you ever lost hours because your team worked on outdated files? Keeping a revision system helps you stay organized and prevents such setbacks.
Incorporating New Equipment
Gyms often update their equipment lineup, so your Revit model should reflect these changes quickly.
- Download manufacturer families:Many brands provide ready-to-use Revit components for their machines.
- Customize families:Adjust dimensions and parameters to match your space and requirements.
- Test placement:Insert new equipment in your model to check for clearance and flow.
Adding new equipment without testing can cause layout issues later. How often do you review your model to catch such problems early?
Ensuring Data Accuracy
Accurate data is the backbone of reliable models. Double-check your inputs regularly.
- Verify dimensions:Measure and compare physical equipment with your model’s data.
- Update parameters:Keep weights, capacities, and other specs current for realistic simulations.
- Use quality control checklists:Create simple lists to confirm key data points before finalizing the model.
Inaccurate data can lead to costly mistakes in construction or procurement. Are you confident your model’s numbers match reality?
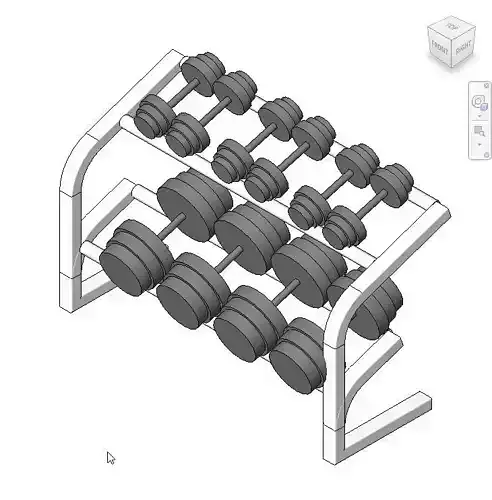
Credit: www.cgtrader.com
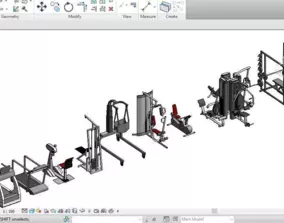
Credit: www.cgtrader.com
Frequently Asked Questions
What Is Gym Equipment Revit Used For?
Gym Equipment Revit is used to create detailed 3D models of fitness machines. It helps architects and designers plan gym layouts efficiently. This tool ensures accurate dimensions and realistic visualization of gym equipment in building projects.
How To Import Gym Equipment Into Revit?
You can import gym equipment into Revit by using families or CAD files. Download or create Revit families for each machine. Then, load them into your project to place and customize equipment in your gym design.
Are There Free Gym Equipment Revit Families Available?
Yes, many websites offer free gym equipment Revit families. These include treadmills, weights, bikes, and more. Using free families saves time and improves project accuracy in gym design.
Can Revit Improve Gym Space Planning?
Revit improves gym space planning by providing precise equipment placement. It helps avoid overcrowding and ensures optimal flow for users. This results in safer and more functional gym layouts.
Conclusion
Gym Equipment Revit helps design gym spaces clearly and quickly. It saves time by offering ready-made models for use. Designers can customize equipment to fit any room size. This tool improves project accuracy and reduces errors. Using Revit supports better planning and organization.
It suits architects, engineers, and gym owners alike. Choose Gym Equipment Revit to create efficient, realistic gym layouts. Simple to use and effective for all skill levels. Keep your projects smooth and professional every time.